A kitchen knife should always be at its best form for it to function as it should both safety and ensuring the best hygiene. If by any chance it happens to have nicks, it will end up frustrating you because you won’t get the quality service you want when doing kitchen preparations.
Normally, the more you use your kitchen knives, the more you expose them to marks and scuffs. For this reason, it’s important to remove abrasions whenever they begin to appear along with taking general care for your kitchen knives.
Just in case you’re wondering how to reshape your kitchen knife, it’s of interest to take note that removing knife nicks is not a rocket-science type of activity, but it’s not an easy one either. There are certain things you have to understand and do right for you to repair your kitchen equipment. We have prepared a guide on how to remove nicks from a kitchen knife.

Locate the Nicks
The first step towards removing nicks from your kitchen knife is to locate where they are. Since you might not be able to see marks clearly by looking at your knife, a better way to establish the location of nicks is by using your fingers. However, you have to be very careful in observing knife safety to avoid cutting your fingers. Once you establish where the nicks are, you will be able to remove them effectively.
What Size Are The Nicks?
Once you have Identified the edges where the marks are, the next step is to check whether they are small or large. Obviously, the size of the nicks will determine the amount of work required to remove them. If they are small, the exercise won’t be extensive, but if they are large, it’s going to take longer. Either way, much of your concentration will be on the part of the knife where the marks are. A simple way to remove small nicks from a kitchen knife is to simply sharpen it until those abrasions and marks disappear.

Sharpening Your Kitchen Knife the Right Way
Sharpening your knife in the right way will help you remove nicks from it and restore its desired look. While it might seem as an easy and obvious thing to do, kitchen knife sharpening requires you to be particular in how you do it for you to get good results. Here are vital tips you should put in mind when sharpening for the purpose of removing nicks:
- Tip 1: Examine the Edge
For you to examine the edges of your knives well so as to remove knife nicks, you can consider being in a place with bright light like the sun. As you hold the edge, you’ll be able to see the position of nicks.
- Tip 2: Test the Sharpness or Dullness of the Edge
Once you have identified the position of nicks, it’s advisable for you to test if the edge of your knife is dull or sharp. Its sharpness and dullness will determine to what extent you will sharpen it to remove the nicks. If the edge slides on your thumbnail, this is a clear indication that it’s dull. However, if it sticks on your thumbnail, it indicates that it is sharp. Most importantly, be careful as you test the edge that you don’t injure yourself.
- Tip 3: Prepare your Whetstone
As you begin the sharpening process, you have to use the most reliable and dependable tools. A whetstone is one of those tools that will help you do away with any marks on your knife. Before you start sharpening your knife to get rid of nicks, make sure that you clean it to remove any dirt that might affect its outcome. You should be able to see the marks clearly so that you remove abrasions well.
- Tip 4: Lubricating the Whetstone
You will need to lubricate your stone so that you keep the edge of your knife off the metal particles that accumulate at the sharpening surface. You can lubricate using oil or splashes of water. It’s always advisable that you begin with the coarser side and end with the finer side.
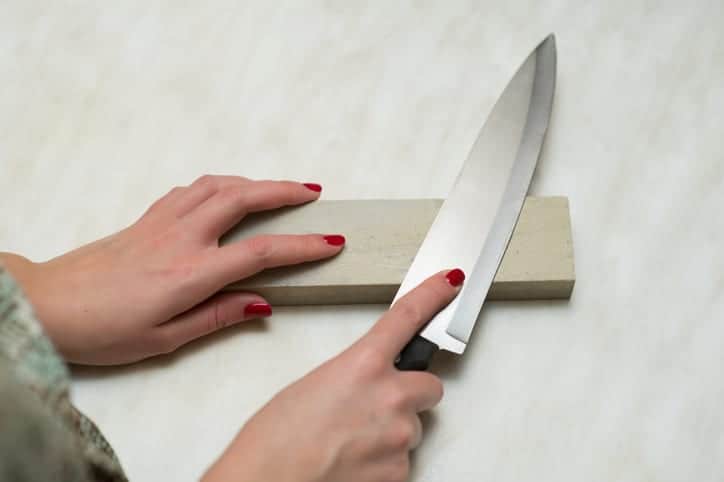
- Tip 5: Mastering the Grip and Motion
A 30-degree angle to the stone will help you master the grip you need during this process. Using a semi-circular motion as well as applying pressure as you push the blade down to the whetstone, you will master the motion that will help you get the best outcomes.
- Tip 6: Confirm Your Progress
As you continue to sharpen your kitchen knife, you should check whether you’re making progress. Test the edge again using your thumbnail to ascertain whether there are rough places on it. In case the edge of your knife is dull, you will notice its ability to reflect light and having a shiny appearance. The sharper it becomes, the less shiny it will be.
- Tip 7: Make Sure You Grind the Opposite Side As Well
For a quality finish, you will have to sharpen the opposite side as well. You will have to hold the whetstone like before. Make sure that you maintain the semi-circular motion as well as the 30-degree angle.
- Tip 8: Confirm Progress Again
Once both sides of the knife are sharp, turn the whetstone and lubricate the fine side. At this point, you will have to repeat the process so that you sharpen the knife fully. After repeating the process, test the sharpness of your knife by cutting through a piece of paper. If the blade can cut through the paper, it shows that it is sharp enough.
By the time your kitchen knife is able to attain such levels of sharpness, the nicks that were present at the beginning should have cleared during the sharpening process. Generally, as you sharpen a knife, you will be able to remove the abrasions, scuffs, and marks.
The most important thing is to ensure you’re sharpening the right way so that you remove knife nicks with ease. In order for you to be successful in the process of nicks removal, there are common mistakes that many people make you should avoid.
Mistakes to Avoid When Sharpening Your Knife for Nicks Removal
Failing to use the right grit
You have to use the right grit to get the results you are looking for. It will be a big mistake for you to start with a fine-grit instead of beginning the sharpening with coarse grit. Especially if your knife’s blade is dull, the best grit to start with is the coarse one then switch to the fine one. If you move to the fine grit without passing your knife through the coarse grit first, you will be left wondering why the edge of your knife is not improving. Therefore, for you to make sure that you remove knife nicks effectively, you should choose the right grit, depending on the sharpness and dullness of your knife. Moreover, ensure that you as you make use of a coarse grit, you should not move to a fine grit before you establish the burr.
- Altering Techniques Quickly
It’s a common mistake for sharpeners to change techniques too quickly. Irrespective of whether the knife is sharp or dull, you should switch sharpening techniques too often because it affects the quality of your progress. If you do so, the nicks on your kitchen knife will take time before they disappear. Rather than wiping out progress, it’s prudent for you to stick with one technique until you begin to see progress as you sharpen your knife. Even if you’re not seeing progress, just maintain the sharpening method you’re using. It will eventually give you results. The one thing you need to take note of is that sharpening your knife will definitely take time and, therefore, you can’t rush the process.
- Holding the Blade at The Wrong Angle
This is another mistake that you should avoid for you to effectively remove nicks from your kitchen knife. The blade should be held at a low angle so as to ensure that it comes out sharp. If you hold it at a higher than recommended angle, the end result will be a dull edge. Thus, the bottom-line here is that you have to hold your knife’s blade at an angle that is lower than what you’re going for in order to get optimum results.
Certainly, it’s not uncommon to have nicks on your kitchen knives. But, this doesn’t mean that they can stay that way. There is something you can do to maintain the profile and shape of your knives. Removing abrasions from your kitchen equipment is not something that is too hard to do as long as you have the right knowledge on how to do it.
Well, sharpening your kitchen knives goes a long way in helping you to remove nicks and marks. However, you have to do it in the right way for you to be successful in the process. By following the right removal steps, knife nicks should be an easy problem to solve.